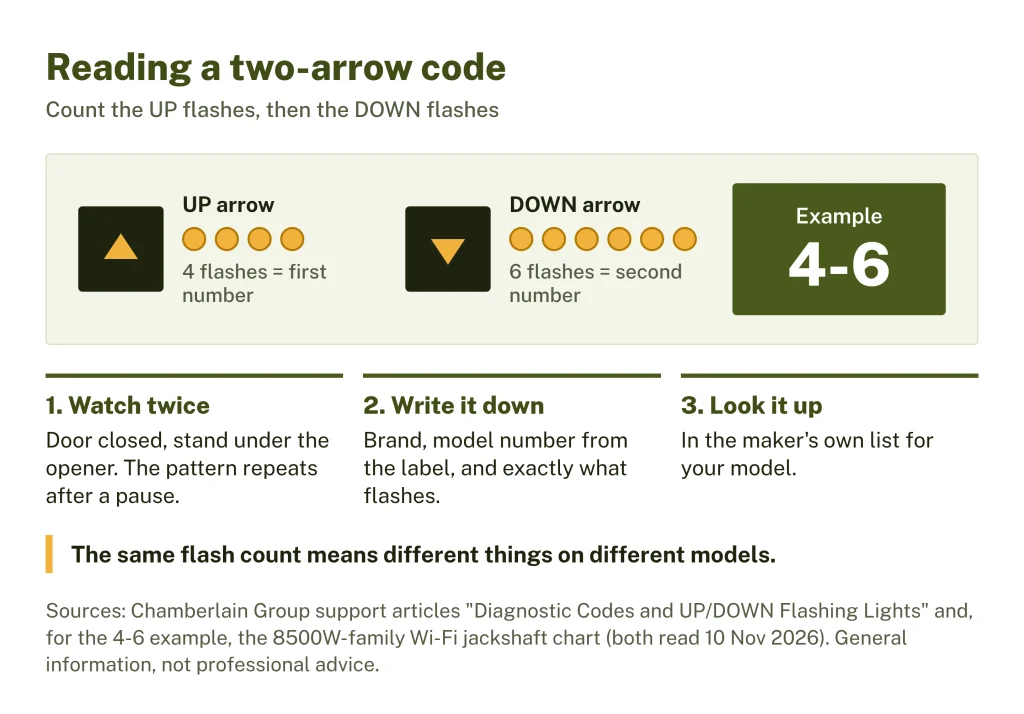
A blinking light on a garage door opener is the opener’s self-check telling you what stopped it. On LiftMaster and Chamberlain openers with UP and DOWN arrow buttons, count the UP flashes, then the DOWN flashes: 4 UP and 6 DOWN is code 4-6, which on the LiftMaster 8500W family of wall-mount openers means the safety sensors are out of line or something briefly blocked their beam. On many ceiling openers the same kind of sensor fault shows as code 1-1, or as the main lights flashing 10 times. Genie openers use two coloured lights on the motor unit instead. The same flash count means different things on different models, so write down the brand, the model number and exactly what flashes, then look it up in the maker’s own list. This page is one of our troubleshooting guides. The lookup above reads the code from the maker documents we have read, says who the maker expects to act, and names the document. The label or manual for your model decides for your opener.
General information, not professional advice. Your door’s maker, your opener manual and a trained door technician decide what’s safe for your door, and local codes decide what needs a permit. The Garage Door Owner sells nothing and recommends no company, technician, product or brand: brands appear here only because their codes are being explained.
Before you touch anything. Some codes point to the door itself, not the opener: a door that is out of balance, a broken spring, a slack lift cable. The federal opener standard makes every opener manual carry these warnings to owners (16 CFR 1211.16(b)(2), read 10 November 2026):
“Have a qualified service person make repairs to cables, spring assemblies and other hardware.”
“For products requiring an emergency release, if possible, use the emergency release only when the door is closed. Use caution when using this release with the door open. Weak or broken springs may allow the door to fall rapidly, causing injury or death.”
16 CFR 1211.16(b)(2), items 7 and 6
The makers say the same in their own words. Chamberlain’s 2023 user’s guide: “ALL repairs to cables, spring assemblies and other hardware, ALL of which are under EXTREME tension, MUST be made by a trained door systems technician.” Genie’s 2024 manual: “NEVER try to repair door hardware or springs yourself.” If a code leads you to a broken spring, a loose or frayed cable, or a door that is crooked or hard to lift, stop there: don’t run the door, keep people and cars clear, and call a trained door technician. Our pages on a broken spring and a snapped or loose cable explain what happens next.
First, work out what is flashing
Stand under the opener with the door closed and watch it go through its pattern twice before you count. The pattern repeats after a pause. What you see tells you which list applies:
- Two arrow buttons flash (UP and DOWN). LiftMaster and Chamberlain openers with a round yellow LEARN button (Security+ 2.0) or a round white one (Security+ 3.0) show codes this way. Count the UP flashes for the first number and the DOWN flashes for the second: 1 UP and 1 DOWN is 1-1, 4 UP and 2 DOWN is 4-2 (Chamberlain Group support, “Diagnostic Codes and UP/DOWN Flashing Lights”). The LiftMaster 8500W, 8500WRGD, 8500WLA, LJ8900W and LJ8950W wall-mount openers use arrows too, with their own chart.
- A small light next to the LEARN button flashes. LiftMaster and Chamberlain AC-powered openers without arrows count the code in flashes of that light, pause, and repeat. The 3800, 8500, RJO20 and RJO20C wall-mount openers use the same light with a longer list.
- The opener’s main lights (bulbs) flash. On LiftMaster and Chamberlain openers, 10 flashes point to the safety sensors and 2 flashes mean the LOCK on the wall control is on (Chamberlain Group support, “Light Blinks but The Door Won’t Close”).
- A coloured light: green, orange, red, blue. On Chamberlain openers with battery backup or Wi-Fi, a light near the LEARN button shows the battery and a light inside the black adjustment button shows Wi-Fi. These are mostly status lights, not faults.
- Two lights on a Genie motor unit, one round and one long, in red, blue, purple, green, yellow or white. Their combination is the code (Genie manual 42598.02135, 10/2024, p. 24).
- The lights on the safety sensors by the floor. These are the photo eyes on each side of the door. On Chamberlain’s 2023 openers the sending sensor has an amber light and the receiving sensor a green one; on Genie’s Safe-T-Beam the sender is red and the receiver green.
Then find the model number on the label on the motor unit, usually on the side or back. Chamberlain Group’s own index of code charts sends you to a different chart by model, so the model number matters more than the brand name. Federal law has required every opener made since 1 January 1991 to be marked with the month or week and year it was made, on the opener and its carton (16 CFR 1211.19), so write that date down as well. On LiftMaster and Chamberlain openers the colour and shape of the LEARN button also dates the opener: Chamberlain Group’s chart puts the round yellow button at 2011 to 2022, the round yellow button with a “Step Saver Set Up” label at 2022 to 2025, and the round white button at 2025 onward (Chamberlain Group support, “How to Identify the Color of the Learn Button”, read 10 November 2026).
A worked example: the lookup’s starting choice
General information, not professional advice. Your door’s maker, your opener manual and a trained door technician decide what’s safe for your door, and local codes decide what needs a permit.
Say you have a LiftMaster 8500W mounted on the wall beside the door, the door won’t close, and the UP arrow flashes 4 times and the DOWN arrow 6 times. Pick “LiftMaster wall-mount Wi-Fi: 8500W…” and then “4-6”. The lookup gives:
- Meaning: the safety sensors are out of line, or the beam was briefly blocked. Chamberlain Group’s chart for these models gives the same meaning and fix for 1-4 and 4-6.
- Who acts: an owner check first; a trained door technician if it continues.
- What you can check: clear the beam and realign both sensors until both sensor lights glow steady and don’t flicker, and make sure nothing hanging on or mounted to the door crosses the sensors’ path as it closes. That last point is in the maker’s chart for these models, and it is easy to miss when the floor itself is clear.
- Document: Chamberlain Group support, “Diagnostic Codes: Wi-Fi Residential and Light-Duty Commercial Jackshaft Operators”, read 10 November 2026.
The same 4 UP, 6 DOWN pattern is not on Chamberlain Group’s code list for ceiling-mounted Security+ 2.0 and 3.0 openers. That article says that if your code isn’t listed, the owner’s manual for your model has the full list. Chamberlain Group’s sensor alignment article does list it, though: on Security+ 2.0 models with arrow lights, the UP arrow flashing 4 times and the DOWN arrow 6 times means the sensors are out of line or blocked, and on Security+ 2.0 models with an LCD display, error code 4-6 means the same (Chamberlain Group, “Garage Door Safety Sensors | How to Align”, read 10 Nov 2026). So on a ceiling opener, check the sensors first, and your model’s manual decides.
LiftMaster error code 4-6, 1-1 and the other sensor codes
Most blinking lights people search for are about the safety sensors. Across the charts we read, these patterns all mean a sensor problem that stops the door closing:
- LiftMaster and Chamberlain arrows: 1-1 (beam blocked, sensors out of line, unplugged or a broken wire), 1-2 (sensor wires reversed or shorted), and on the 8500W family also 1-4 and 4-6 (out of line or briefly blocked).
- LiftMaster and Chamberlain LEARN light: 1 flash (broken or disconnected sensor wire), 2 flashes (shorted or reversed wire), 4 flashes (sensors slightly out of line, receiving light dim or flashing).
- The main lights flashing 10 times on LiftMaster and Chamberlain.
- Genie: the round light flashing red with the long light off, and on the Safe-T-Beam itself, the red light blinking 2 or 3 times.
Why the door won’t close at all. The federal standard for residential openers made since 1 January 1993 requires a second layer of protection, such as photo eyes, an edge sensor on the door or a constant-pressure wall button, on top of the opener’s own reverse-on-contact system (16 CFR 1211.6(b) and 1211.8; 1211.1). The opener must check that device at least once every time it closes. If the device is missing or faulty, a closing door must open again and an open door may not close more than 1 foot below its fully open position, or the opener must fall back to closing only while someone holds a control in sight of the door (1211.8(c), 1211.6(b)(1)). So a sensor code is the opener doing what the rule asks, not a broken opener. A sensor that has to be lined up must have a way, such as a light, to show it is aligned (1211.10(a)(5)); the rule doesn’t fix the colours, which is why every maker’s lights differ.
A change to this rule, CPSC’s direct final rule 2026-22213 (91 FR 68456, 30 October 2026), is scheduled to take effect 29 December 2026 unless CPSC receives significant adverse comments by 30 November 2026 (checked 10 November 2026). It adopts the 2025 edition of the UL 325 safety standard and adds tests for battery-backup openers; it does not change the owner warnings quoted on this page.
What the makers give owners for a sensor code. Clear anything from between the sensors. Look at both sensor lights: on Chamberlain’s sensors both should glow steady; a green light that is off or blinking means the sensors are out of line or blocked, and both lights off means no power is reaching them. Chamberlain Group’s support article tells owners to loosen the wing nut on the receiving sensor, aim it at the other one until its light glows steady, and tighten the wing nut again. Wipe the lenses. If the sun shines straight into the receiving sensor late in the day, Chamberlain’s 2023 guide says to swap the sensors to opposite sides; Genie’s 2024 manual says to put its red (sending) sensor on the sunny side. Look along the sensor wires for staples, cuts or crossed wires. Our safety sensor guide covers alignment, cleaning and the lights in detail.
Beyond looking, the wiring tests in these articles are not owner steps on this site. Chamberlain Group’s own arrows article flags its short-wire test, which means cutting and stripping the sensor wires, as “Technician Recommended”. The LEARN-light article goes further into wire repairs, logic boards, capacitors and gears; those are repairs, and the lookup marks them as technician work.
Closing the door while you wait. Chamberlain Group’s articles say you can close the door by pressing and holding the wall control push bar until it is fully down, but that “Any garage door opener or replacement logic board manufactured after February 3, 2022, will no longer have this feature.” Two other Chamberlain Group charts print a similar cut-off note beside the “lights flash” symptom, and the arrows article says the main lights may flash 10 times “depending on the opener model”, so a newer opener may show a sensor fault without flashing its bulbs at all. Genie’s 2024 manual still gives press-and-hold of the wall control to force the door closed when the opener won’t close. Either way, keep the door in sight the whole way down and keep people, pets and cars clear. Never tape, jumper or point the sensors at something else to get around them: the opener won’t close without them for the reason above, and the sensors are what stops the door on a child.
Which list we read for each opener
| Opener and what flashes | Codes | Maker’s document (read 10 Nov 2026) |
|---|---|---|
| LiftMaster or Chamberlain, UP/DOWN arrows | 1-1 to 5-5 | Chamberlain Group support article |
| LiftMaster 8500W family, arrows | 1-1 to 5-5, incl. 4-6 | Chamberlain Group support article |
| LiftMaster or Chamberlain, LEARN light | 1 to 6 flashes | Chamberlain Group support article |
| LiftMaster 3800, 8500, RJO20, RJO20C | 1 to 15 flashes | Chamberlain Group support article |
| LiftMaster or Chamberlain, main lights | 10 or 2 flashes | Chamberlain Group support article |
| Chamberlain battery and Wi-Fi lights | Colours | Support article; 114-5851-000 (2023) |
| Chamberlain 2023 Wi-Fi openers, sensors | Sensor lights, beeps | 114-5851-000 (2023) |
| Genie belt and chain, powerhead lights | Colour pairs | Genie 42598.02135 (10/2024) |
| Genie Safe-T-Beam | Red blinks | Genie 42598.02135 (10/2024) |
| Craftsman | Not confirmed | None read |
LiftMaster and Chamberlain are both brands of The Chamberlain Group, and its support site gives the codes and steps for both. We have not read a LiftMaster model owner’s manual: liftmaster.com refused our reader on 10 November 2026, so every LiftMaster and Chamberlain row below comes from Chamberlain Group’s support articles and its 2023 Chamberlain user’s guide, which are undated web pages or printed documents read that day.
Every code we read, opener by opener
Meanings are our plain-English paraphrase of the maker’s text, not the maker’s wording. “Owner check” means the maker gives owners something to try; on this site that never includes work on springs, cables, drums or the brackets at the bottom of the door, whatever a chart says.
LiftMaster or Chamberlain with UP and DOWN arrows (Security+ 2.0 and 3.0)
| Code | What it means | Who acts |
|---|---|---|
| 1-1 | Sensor beam blocked, sensors out of line or unplugged, or a sensor wire broken. The door starts down and reverses or won’t close; on some models the main lights flash 10 times. | Owner check (beam, alignment, sensor lights); wiring tests are technician work |
| 1-2 | Sensor wires reversed or shorted. The door stays open. | Owner looks at the wires; repair is technician work |
| 1-5 | The opener didn’t sense its motor turning after a command: it hums or clicks and the door barely moves. | Technician; on a wall-mount opener whose release was pulled, reconnect the door first |
| 1-6 | The door moved without a command: often out of balance, or a released wall-mount door moved by hand. | Owner balance check; out of balance = technician |
| 2-1 to 2-5 | Logic board (main circuit board) fault. | Owner unplugs for 5 seconds once; then technician |
| 4-1 | Resistance while closing. | Owner clears the path; then technician |
| 4-2 | Resistance while opening; the door stops before fully open. | Owner clears the path, then the balance check; then technician |
| 4-3 | Motor speed dropped while closing, often just before the floor. | Owner clears the path; then technician |
| 4-4 | Motor speed dropped while opening. | Owner clears the path, then the balance check; a broken spring = stop |
| 4-5 | Travel module not recognised, usually right after a part was replaced. | Technician |
| 5-5 | Wall-mount 8500W/RJO70, 98022/RJO101 and 98032 only: an app, schedule or Timer-to-Close command needs the paired remote light. | Owner: plug in and pair the light, or turn off schedules |
| 3-5 | Wall-mount models named in the article only: the cable tension monitor found a possible slack cable, or a monitor fault. | Stop and technician if a cable looks loose, frayed or off its drum |
LiftMaster 8500W, 8500WRGD, 8500WLA, LJ8900W and LJ8950W wall-mount openers
| Code | What it means | Who acts |
|---|---|---|
| 1-1 | Sensors not installed or not connected, or a wire cut: the door won’t close. | Owner looks at the wires; repair is technician work |
| 1-2 | Sensor wire shorted or reversed: the door won’t close. | Owner looks at the wires; repair is technician work |
| 1-3 | Wall control wires shorted, or the wall control is faulty. | Owner looks at the wire; testing and replacing is technician work |
| 1-4 and 4-6 | Sensors out of line or briefly blocked: the door won’t close. | Owner check: realign until both lights are steady; nothing on the door crossing the beam |
| 1-5 | The door moves 6 to 8 inches and stops or reverses, a single click, or a 1 to 2 second hum. The maker’s chart points to binding or something in the way, “such as a broken spring or door lock”, then opener parts. | Owner moves the door by hand with the door closed first; a broken spring = stop |
| 1-6 | The door coasts after the opener has stopped it. | Owner reprograms travel by the manual; balancing is technician work |
| 2-1 to 2-5 | No movement or sound; the maker’s fix is a new logic board. | Technician |
| 3-1 | The opener moves the door slightly, then stops. | Owner tries once more; then technician |
| 3-3 | Battery light keeps flashing green: a charging circuit fault on the logic board. | Technician |
| 3-5 | Won’t close, or reverses: in this chart, a cable tension monitor that must be relearned after one of two monitors was removed. | Stop and technician; owner only looks at the cables |
| 4-1 to 4-4 | The door stops or reverses while moving. | Owner moves the door by hand with the door closed first; binding or sticking = technician; if it moves freely, the maker says reprogram the travel by the manual |
| 4-5 | The opener can’t talk to its travel module. | Technician |
| 5-5 | Timer-to-Close or the app won’t close the door: the remote light must be plugged in and paired. On the light-duty models the maker says this code means a logic board fault instead. | Owner (light); on the light-duty commercial models, technician |
LiftMaster or Chamberlain without arrows: the light next to the LEARN button
| Flashes | What it means | Who acts |
|---|---|---|
| 1 | A sensor wire is broken or disconnected. | Owner looks at the wires; repair is technician work |
| 2 | A sensor wire is shorted, or the black and white wires are reversed. | Owner looks at the wires; repair is technician work |
| 3 | Wall control problem: the wires are shorted (often a staple) or the control is faulty. | Owner looks at the wire; testing and replacing is technician work |
| 4 | Sensors slightly out of line: the sending light is steady, the receiving light dim or flashing. | Owner check: clean, realign, tighten |
| 5 | The motor didn’t turn in its first second: usually a mechanical stop. The maker lists an unbalanced door, a broken spring, a manual lock left on the door, the trolley stuck at the rail’s stop bolt, worn gears, a capacitor or a motor that overheated after many runs (it says to let it cool 45 minutes). | Owner unplugs for 5 seconds once and does the balance check with the door closed first; spring, gears, capacitor and motor are technician work |
| 6 | Motor circuit failure; the maker’s fix is a new logic board. | Technician |
LiftMaster 3800, 8500, RJO20 and RJO20C wall-mount openers (LEARN light)
| Flashes | What it means | Who acts |
|---|---|---|
| 1 or 2 | A sensor light isn’t steady: a shorted, reversed, broken or disconnected sensor wire. The door won’t close. | Owner looks at the wires; repair is technician work |
| 3 | The wall control isn’t working. | Owner looks at the wire; testing is technician work |
| 4 | Sensors out of line: the door reverses and the lights flash. | Owner check: realign |
| 5 | No motor rotation in the first second: no movement, grinding, or under 6 inches of travel. The maker says check the door is engaged to the opener; the rest is motor parts. | Technician; owner reconnects a released door first |
| 6 | The door coasts after reaching its limit: the maker asks whether the door drifts on its own when disconnected. | Owner balance check with the door closed first; then technician |
| 7 | Motor short: no movement, no sound. | Technician |
| 9 | Cable tension reversal: the maker points to cable depth, track radius or a hot door. | Stop and technician |
| 10 or 12 | Force reversal, opening (10) or closing (12): the maker says run it again and the opener raises its own force setting a step. | Owner runs it again; still stopping = technician |
| 11 or 13 | Maximum force reached, closing (11) or opening (13): the maker says reset travel and force, and if that fails, look for a door problem. | Owner resets by the manual, then the reverse test; still stopping = technician |
| 15 | The logic board failed its own error check. | Technician |
LiftMaster or Chamberlain: the main opener lights flash
| Flashes | What it means | Who acts |
|---|---|---|
| 10 | A safety sensor problem: the door won’t close. On some openers without bulbs you may hear clicking instead. | Owner check: align the sensors |
| 2 | The LOCK on the wall control is on, so remotes are locked out (the wall control still works). | Owner: press LOCK to turn it off |
Chamberlain with battery backup or Wi-Fi: the colour lights
| Light | What it means | Who acts |
|---|---|---|
| Battery: solid green | Battery fully charged; not running on battery. | Nothing to fix |
| Battery: flashing green | Battery charging. | Nothing to fix |
| Battery: solid orange, beep about every 2 seconds | Power is out; the opener is moving the door on battery. | Nothing to fix |
| Battery: flashing orange, beep every 30 seconds | Battery low; it recharges when power returns. | Nothing to fix |
| Battery: red, beep every 30 seconds | The battery has drained and can’t recharge. | Owner: replace the battery |
| Wi-Fi: solid blue / solid blue and green / solid green | Connected to a phone / added to another gateway / connected to the server, normal. | Nothing to fix |
| Wi-Fi: blinking blue / blinking blue and green / blinking green | Wi-Fi learn mode / trying to reach the router / trying to reach the server. | Status |
Chamberlain’s 2023 user’s guide (114-5851-000, p. 9) gives the same battery colours and says the backup gives up to 24 hours of operation. More on the opener battery backup page.
Chamberlain 2023 Wi-Fi openers: sensor lights and beeps (guide 114-5851-000)
| What you see or hear | What it means | Who acts |
|---|---|---|
| Both sensor lights glow steady | Aligned and powered: normal. | Nothing to fix |
| Either sensor light off | No power to that sensor: check the opener has power and look along the wire. | Owner check; then technician |
| Green (receiving) light blinking | Sensors blocked or out of line. | Owner check: clear and realign |
| Opener hums 1 to 2 seconds, 5 flashes and 5 beeps | The door is binding or blocked. | Owner moves the door by hand with the door closed first; binding = technician |
The guide covers chain drive models C2102, C2202T, C2212T, C2405T, D2101 and D2405T and belt drive models B2202T, B2210T, B2211T, B2212T, B2215T, B2401T, B2405T and B4505T.
Genie belt and chain openers: the round and long powerhead lights
| Round, long | What it means | Who acts |
|---|---|---|
| Both off | Normal on standard models; if nothing works, the opener isn’t responding. | Owner checks power; then a trained door system professional |
| Both red, steady | Travel limits not set. | Owner programs the limits (pp. 7-8) |
| Both red, flashing | Program error, or a component failure. | Owner unplugs 5 seconds once; then technician |
| Round blue or purple flashing, long off | Remote not programmed. | Owner programs the remote (p. 10) |
| Round red flashing, long off | Safe-T-Beam blocked, or interference from another sensor pair. | Owner check |
| Round off, long red flashing | The door hit something going up or down, or the opener detected a door component failure. Genie says remove the obstruction and check the spring, track, rollers, hinges and fixtures. | Owner looks only, door closed, from the floor; anything wrong = technician |
| Round off, long red steady | Thermal cutout: the motor is too hot. | Owner: don’t unplug; wait for the light to clear |
| Round off, long blue flashing | The door won’t open because Sure-Lock is on. | Owner turns Sure-Lock off (troubleshooting, pp. 23-24) |
| Both purple, steady | Component error. | Technician |
| Both purple, flashing | Radio receiver error. | Owner unplugs 5 seconds once; then technician |
| Battery models: both green steady / green flashing / yellow flashing | Charged / power out, running on battery / charging. | Nothing to fix |
| Battery models: both flashing red to yellow | Dead backup battery. | Owner lets it charge 48 hours; if it fails, replaces it |
| Battery models: both white steady | Courtesy light while running on battery; it goes off after 4 minutes. | Nothing to fix |
Genie’s manual covers several current belt and chain models; Genie’s support pages for the 7155L, 7055 and 7035 link to it. Standard models show no lights in normal use; battery-backup models show both lights steady green. Genie warns never to adjust the force settings to make up for damage, including an unbalanced door, binding track or a broken spring (pp. 9, 16).
Genie Safe-T-Beam sensor lights (red sender, green receiver)
| Red, green | What it means | Who acts |
|---|---|---|
| On, on | Normal. | Nothing to fix |
| Off, off | Opener not powered, or bad wiring from the opener or to the sender. | Owner checks breakers, fuses, plug; looks at the wiring |
| Off, on | Power was interrupted. | Owner removes power and reapplies it |
| 2 blinks, on | Beam out of line or blocked, or a sensor defective. | Owner check; then Genie customer support |
| 2 blinks, off | A sensor wire missing or bad, or a sensor defective. | Owner looks at the wiring; then Genie customer support |
| 3 blinks, on | The sensor is picking up interference. | Owner looks for the source; then Genie customer support |
| 4 blinks, on | The sending (red) sensor is defective. | Genie says replace the Safe-T-Beam pair |
Genie says to use only the Safe-T-Beam sensors that came with the opener, not another brand’s (manual 42598.02135, p. 18).
Craftsman, older models and other brands: not confirmed
Craftsman. We could not confirm who makes today’s Craftsman-branded openers in a maker’s own document, and we have not read a Craftsman code list on a maker site, so the lookup shows Craftsman as not confirmed. CPSC’s 1997 recall 97-116 shows that Chamberlain made Sears Craftsman openers at that time, which is why older Craftsman openers can look like Chamberlain units, but that doesn’t tell you what your model’s lights mean. Find the model number on the label and read that model’s manual.
LiftMaster and Chamberlain charts we have not read. Chamberlain Group’s index also lists separate charts for the 2500B, 2500D, 3500 and 3850 DC units and for the LiftMaster model 2500. We did not open them, so those models are not in the lookup. Some older openers carry a square LEARN button; Chamberlain Group’s chart says those were made before 1993 and are no longer supported.
Genie screw drive, wall-mount and older openers, and every other brand. Only the 2024 belt and chain manual was read. If your opener isn’t in the lookup, its manual is the only reliable list. If you don’t have it, the model number on the label is what the maker’s support line will ask for.
What you check, where you stop, what the technician does
You check
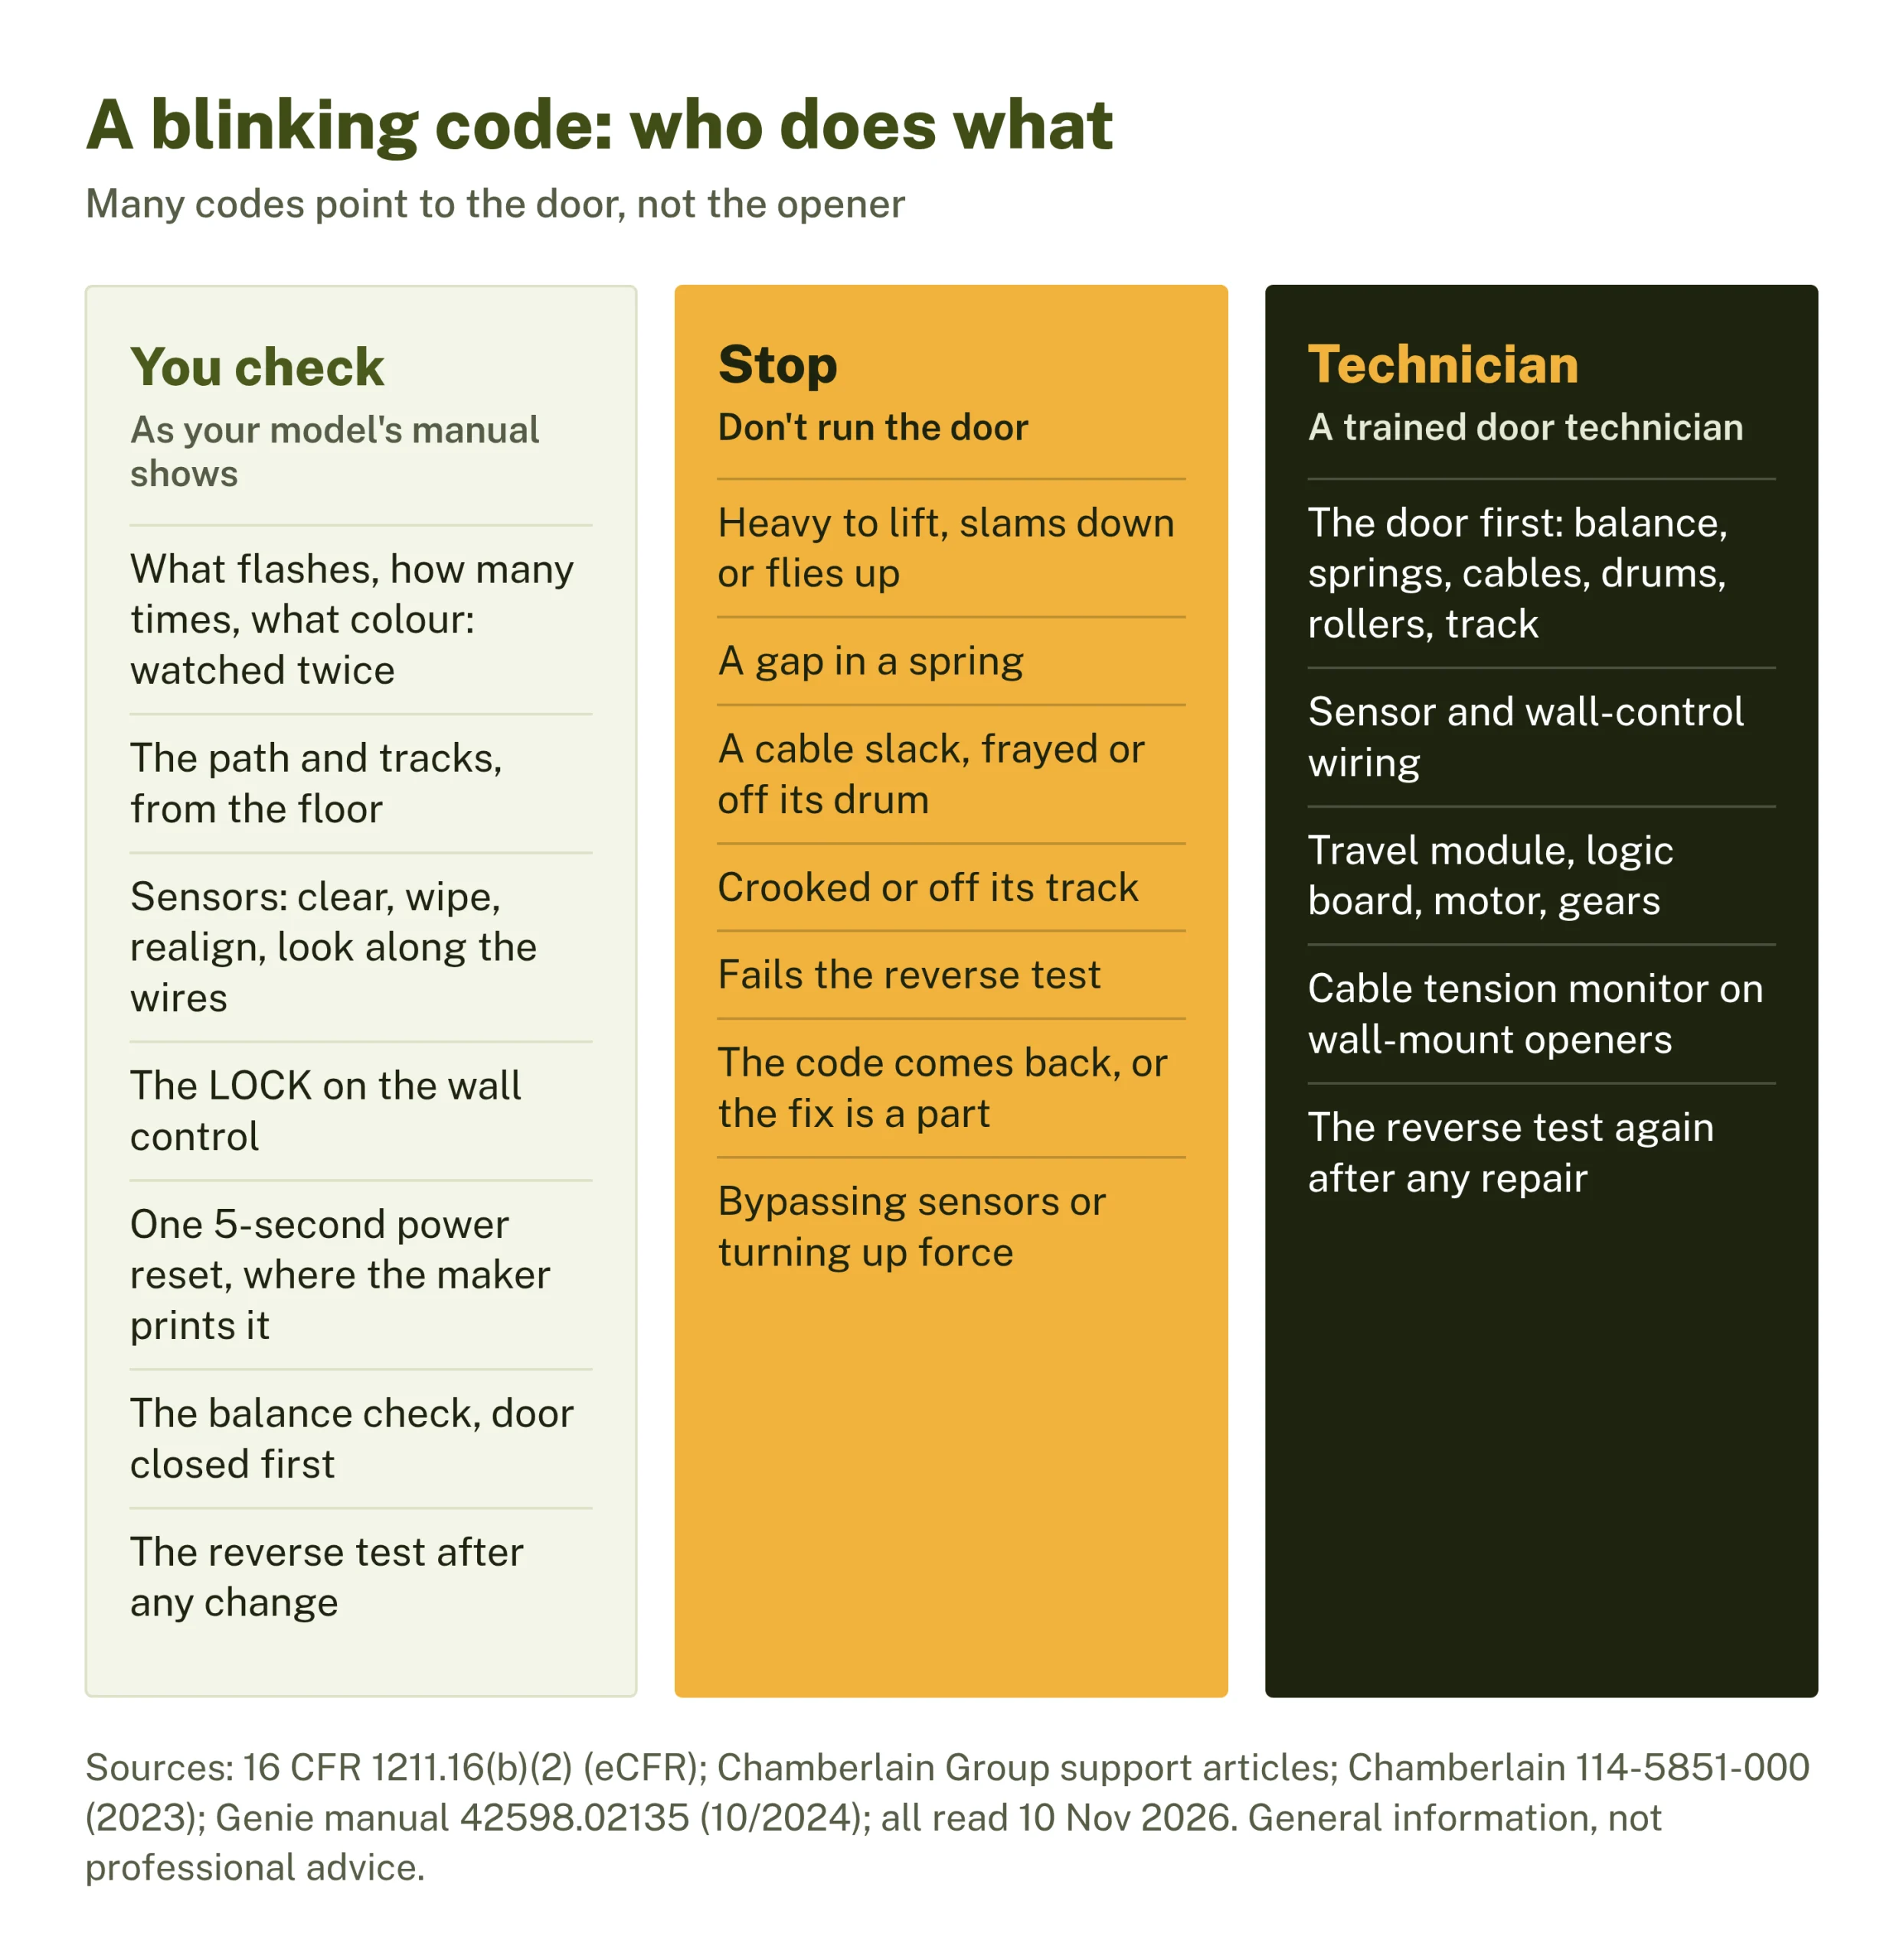
- What flashes, how many times, in what colour: watch the pattern twice (the maker’s chart for your model).
- The path and tracks for anything in the way, from the floor (Chamberlain Group arrows article, codes 4-1 to 4-4).
- The safety sensors: clear the beam, wipe the lenses, realign by the wing nut until the lights are steady, look along the wires (Chamberlain 114-5851-000 p. 10; Genie 42598.02135 pp. 18, 21).
- The LOCK on the wall control, or Genie’s Sure-Lock (Chamberlain Group support; Genie pp. 23-24).
- One power reset where the maker prints it: unplug the opener, and the backup battery if it has one, for 5 seconds (Chamberlain Group, codes 2-1 to 2-5; Genie p. 24). Not for a Genie thermal cutout: Genie says don’t unplug it.
- Where the code points to the door, the balance check with the door closed first: pull the release, lift the door by hand to about 3 or 4 feet and let go. Genie’s manual says it should “remain stationary or slowly drift closed” (p. 21). The balance test page walks through it.
- Programming remotes or limits and letting the opener set its own force, as the manual for your model shows (Genie pp. 7-10; Chamberlain 114-5851-000 p. 12), followed by the reverse test below.
Stop
- The door is heavy to lift, slams down or flies up when released, or won’t stay put during the balance check.
- You see a gap in a spring, a cable that is slack, frayed or off its drum, or a door that is crooked or off its track. On the LiftMaster wall-mount openers, codes 3-5 and RJO 9 flashes are about cable tension: look only.
- The door fails the reverse test, or closes with the sensor beam blocked. Chamberlain’s 2023 guide says to call a trained door systems technician if it closes with the sensors blocked.
- The code comes back after the checks above, or the maker’s fix is a part: a logic board, travel module, motor, gears or capacitor.
- Any idea of bypassing the sensors or turning up the force to push a stiff door.
Technician
For an opener code, a trained door technician will usually start with the door, not the opener: with the opener disconnected, they check the balance, the springs, cables, drums, rollers and track, because a stiff or unbalanced door causes many of the force and motor-speed codes. Then the opener: the sensor wiring end to end (the short-wire test Chamberlain Group flags as technician work), the wall-control wiring, the travel module or RPM sensor, the logic board, and on wall-mount openers the cable tension monitor. After any repair or any change to travel or force, they should run the reverse test again, as the federal warning says. Ask what they found on the door as well as the opener, which part they replaced, and to see the reverse and photo-eye tests pass before they leave.
After any fix: the two monthly tests
Once the light stops, test the opener before you trust it. The federal standard makes every opener manual carry this warning:
“Test door opener monthly. The garage door MUST reverse on contact with a 1 1/2 inch object (or a 2 by 4 board laid flat) on the floor. After adjusting either the force or the limit of travel, retest the door opener. Failure to adjust the opener properly may cause severe injury or death.”
16 CFR 1211.16(b)(2), item 5
- Reverse test. Lay a 2 by 4 flat on the floor in the middle of the doorway and close the door on it. It must stop and reverse. Genie’s 2024 manual says within 2 seconds; Chamberlain’s 2023 guide says that if it stops but doesn’t reverse, program the travel again and retest, and if it still fails, call a trained door systems technician.
- Photo-eye test. Start the door down and pass something through the beam. The door should reverse to fully open (DASMA TDS-364, rev. 6/26). DASMA says the beam should be no higher than 6 inches above the floor; CPSC’s Publication 523 says 4 to 6 inches.
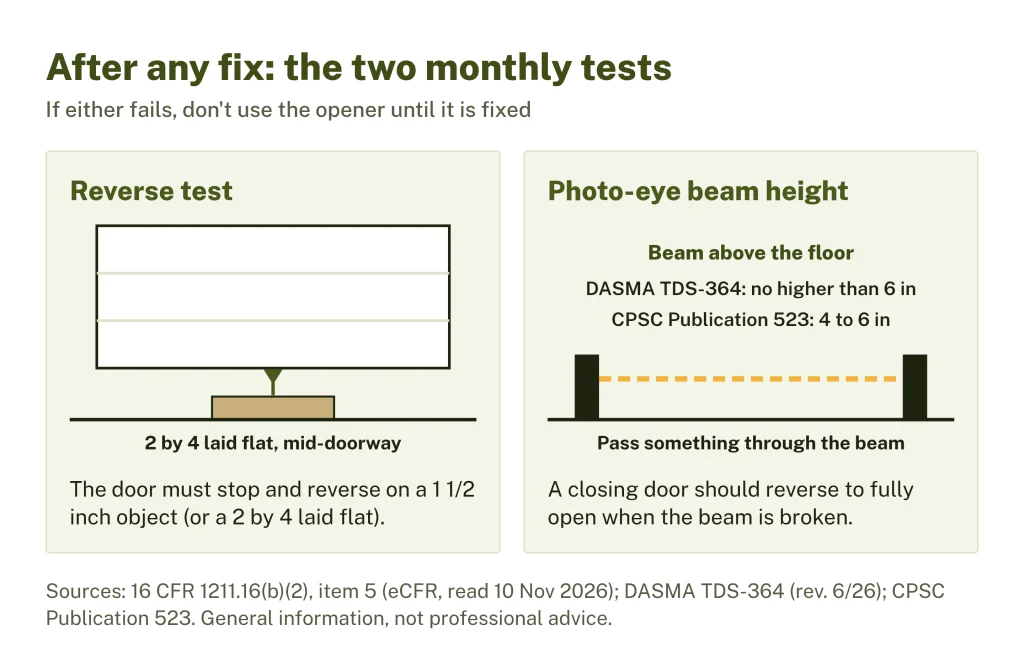
If either test fails, don’t use the opener until it is fixed: CPSC’s Publication 523 says to disengage an opener that fails the test until it has been adjusted, repaired or replaced. The garage door safety checks page has both tests step by step, with the rest of the monthly list.
What to write down before you call

- The brand, the model number and the date of manufacture from the label on the motor unit, and the colour of the LEARN button.
- Exactly what flashed: which light, what colour, how many times, counted twice. A short phone video of one full pattern helps.
- What the door did: wouldn’t close, started down and reversed, stopped near the floor, hummed, drifted down after opening.
- What changed recently: a power cut, new sensors or a new part, something hung on the door, a bang from the springs, a car that touched the door.
- What you checked and what happened: sensor lights, balance check, reverse test.
What can’t wait: a door that won’t reverse, a broken spring with the door open, and a loose or frayed cable. Leave those doors where they are, keep everyone clear, and call.
Why code lists online may not match your opener
You may see a single “LiftMaster code chart” on other sites. We checked the makers’ own charts, and that isn’t how they work. Chamberlain Group keeps separate charts for ceiling openers with arrows, for the 8500W family, for the 3800 and RJO wall-mount openers, for openers with a flashing LEARN light, and for the 2500-series DC units, and the same number means different things across them. Code 3-5 is a cable tension monitor problem on both wall-mount charts, but the fix each chart gives differs. Code 5 flashes on the LEARN light is a motor that didn’t turn, while 5 UP and 5 DOWN on the arrows is a missing remote light for app control. A list that doesn’t say which models it covers can send you to the wrong fix.
Some pages also suggest testing the auto-reverse with a roll of paper towels, or “bypassing” the sensors to get the door down. Neither is in any primary text we read: the federal test object is a 1 1/2-inch object or a 2 by 4 laid flat, and the sensors are the second layer of protection the rule requires.
Sources checked on 10 November 2026: 16 CFR part 1211 on the eCFR (sections 1211.1, 1211.8, 1211.10, 1211.16, 1211.19) and Federal Register rule 2026-22213 (91 FR 68456); Chamberlain Group support articles “Garage Door Opener | Diagnostic Codes and UP/DOWN Flashing Lights”, “Diagnostic Codes for Chamberlain & Liftmaster Garage Door Openers”, “Diagnostic Codes: Wi-Fi Residential and Light-Duty Commercial Jackshaft Operators”, “Diagnostic codes for Residential Jackshaft Opener (RJO)”, “What Does the Flashing LED Next to the Learn Button Mean”, “What the Different Color LEDs on a Garage Door Opener Mean”, “Garage Door Opener Light Blinks but The Door Won’t Close” and “How to Identify the Color of the Learn Button”; Chamberlain Wi-Fi Garage Door Opener User’s Guide 114-5851-000 (2023); Genie Belt/Chain Drive Garage Door Openers Programming, Operation and Maintenance Manual 42598.02135 (10/2024); DASMA TDS-364; CPSC Publication 523; CPSC recall 97-116. Not read: LiftMaster model owner’s manuals, Chamberlain Group’s DC-model charts, any Craftsman maker document.
Formulas and sources
- The pattern picked in the chosen list: Row lookup on the reader's choice, no outside figure
- Meaning in the maker's document (row data): Chamberlain Group support: Diagnostic Codes and UP/DOWN Flashing Lights
- Who acts (row data): Chamberlain Group support: Wi-Fi Residential and Light-Duty Commercial Jackshaft diagnostic codes
- Owner check (row data): Genie Belt/Chain Drive Programming, Operation and Maintenance Manual 42598.02135 (10/2024)
- Document (row data): Chamberlain Group support: What Does the Flashing LED Next to the Learn Button Mean
- Label reminder: 16 CFR 1211.19, date of manufacture marking (eCFR)
Sources
- 16 CFR part 1211, Safety Standard for Automatic Residential Garage Door Operators (eCFR, read 10 Nov 2026)
- Federal Register 2026-22213, 91 FR 68456 (30 Oct 2026), direct final rule
- Chamberlain Group support: Garage Door Opener | Diagnostic Codes and UP/DOWN Flashing Lights (read 10 Nov 2026)
- Chamberlain Group support: Diagnostic Codes for Chamberlain & Liftmaster Garage Door Openers (index, read 10 Nov 2026)
- Chamberlain Group support: Diagnostic Codes: Wi-Fi Residential and Light-Duty Commercial Jackshaft Operators (read 10 Nov 2026)
- Chamberlain Group support: Diagnostic codes for Residential Jackshaft Opener (RJO) (read 10 Nov 2026)
- Chamberlain Group support: What Does the Flashing LED Next to the Learn Button Mean (read 10 Nov 2026)
- Chamberlain Group support: What the Different Color LEDs on a Garage Door Opener Mean (read 10 Nov 2026)
- Chamberlain Group support: Garage Door Opener Light Blinks but The Door Won't Close (read 10 Nov 2026)
- Chamberlain Group support: How to Identify the Color of the Learn Button (read 10 Nov 2026)
- Chamberlain Wi-Fi Garage Door Opener User's Guide 114-5851-000 (2023), via Chamberlain Group support Manuals
- Genie Belt/Chain Drive Garage Door Openers Programming, Operation & Maintenance Manual 42598.02135 (10/2024)
- DASMA Technical Data Sheet index (TDS-364 Photoelectric Sensor Location)
- CPSC Publication 523, Non-Reversing Automatic Garage Door Openers Are a Hazard
- Chamberlain Group support: Garage Door Safety Sensors | How to Align (read 10 Nov 2026)